Friday, September 21, 2012

D.I.Y. Distressing Denim


SEP 21. 2012

# DIY


credit by   AzaleaBoutique

Galaxy Jeans


sep 21, 2012

DIY// Galaxy Jeans  


:)

 i  found  DIY tutorial - galaxy jeans, 

and think it's interesting. i have post it on here
Want to know how to make your own pair of galaxy jeans?

You'll need:
- A pair of black jeans. Scour thrift stores for some cheap ones you won't be afraid to destroy.
- A spray bottle filled with two parts bleach (javel) and one part cold water
- Some acrylic paints. I used Liquitex Heavy Body in Titanium White, Brilliant Blue, Medium Magenta and Pyrrole Red, but any brand will work.
- An old toothbrush
- A sponge
- Little containers/plates to mix the paint
WARNING: As you can see, the pictures show both sides of the jeans. However, you should do only one side at the time 


HOW TO CARE FOR YOUR DIY JEANS: As long as you are careful while washing them, the paint should not come off. I turn mine inside out and hand-wash them in cold water with a detergent made especially for delicate items, then I hang them up to dry. No problems so far ;) However, if you wear the jeans very often,you might have to paint some more stars after a few washes. 

1. Start with a pair of clean black jeans. Protect your workspace with newspapers or plastic bags, then kiss your old jeans goodbye! Mwahaha 


2. Spray bleach on the jeans. Be careful not to spray to much right away! Wait until orange spots start appearing (it takes a few seconds) and spray some more bleach if you want the spots to be more intense.


3. Mix your first colour and use to sponge to apply it around the orange spots. I first applied a shade of blueish purple, then I put some red, applying it around the orange spots to add more dimension. I also painted lighter areas with a light periwinkle shade. Blending the colours together will give your design a softer look, but don't forget to rinse the sponge once in a while.


4. Brighten certain areas by applying white paint.


5. Now it's time to make some stars! Pour a tiny bit of water in a small container and add a blob of white paint. Dip the toothbrush in it and pull the bristles back with your fingers to create some white speckles. Try putting more speckles on the lighter areas. If the speckles disappear, add more paint to the mix.


6. Make some last adjustments: lighten some areas by sponging more white paint or spraying more bleach. Add some more stars... This is what my final front design looked like:


7. Once you're happy with the results, let it dry and repeat all the steps on the other side of the pants. Be especially careful around the butt area, since it does not lay flat. When you're done with both sides, take look at the seams. They might look pretty odd! A quick remedy? Spraying bleach along the seam and adding stars usually do the trick. Don't spray too much or you'll get odd-looking spots!


8. Enjoy wearing your new galactic pants! My new jeans got me a ton of compliments today. I always roll the hems of my jeans, so I did the same with those and the plain black hems looked very chic! I think I'll use some black fabric paint to hide the bleach spots, though... But that's an optional step!


Summer Nights Hair Tutorial


braid hair 


Supplies: bobby pins, small wildflowers (real or faux).
1. Start with your hair down. but this pictuere, her hair is very straight naturally, so she curled it the day before, giving it a messy, wavy look. 2. First, take a small strand from each side of your head close to your ear, wrap it around to the opposite side and pin in place. 3 - 4. Repeat this process two more times, creating six strands crossing back and forth. 5. Next, create a semi-loose braid with the rest of your hair. 6. Lastly, add flowers throughout your braid! 


credit by  sincerelykinsey

Monday, September 17, 2012

4 GREAT HAIR TUTORIALS

4 Great hair tutorials
: )

I wanted to share a few great hair tutorials with you today. ( : .  the hairstyles look even more perfect. it's braided hairstyles. really cute. 

 Everyday hairstyle from The Girl Never Gets Older.
  Double braid gibson tuck tutorial by Über Chic for Cheap.
  A cute bun with braids on Instabraid.
  A hair how to by Sea of Shoes.

DIY – RAFFIA BRACELET

Create a cute fishtail braided bracelet with raffia! @ By Wilma


   :|>

bracelet tutorial 
This one is made with raffia.
it’s so natural and easy to work with.


 What you need for this raffia bracelet

- raffia in two colors

- scissors
- eventually tape
PICTURES
Create a cute fishtail braided bracelet with raffia! @ By Wilma
How to make a cute raffia bracelet

1. Decide on two colors for this bracelet,  cut from both colors two pieces of 1,60 meter each. So in total you will have four strands, two of both colors.

2. Twist the raffia in the middle of the strands. Fold and make a knot. You will now have a loop at the end of your bracelet.
3. Start with a fishtail braid after the loop. If you want to you can tape the loop to the table to secure it. You can do this by dividing the strands in two with on both sides 2 strands of each color. Look at the picture for how to divide the colors. Start with bringing the strand most left to the left side of the four strands on the right. Now take the strand most right and bring this to the right side of the three strands on the left.
4. When you continue this process you will create a small fishtail braid.
5. When your bracelet is almost big enough to wrap twice around your wrist you have to make two small normal braids from the strands.
6. End with a knot.
7. To wear this bracelet, simply put one of the small braids trough the loop and make a knot with the other braid. That’s it! XO Wilma
credit by wilma

DIY – VINTAGE LACE PURSE

diy vintage lace bag mod podge

original
diy vintage lace bag mod podge

What you need for this DIY vintage lace bag
- an old leather bag or purse
- lace
- Mod Podge
- brush
- Fabric glue
- scissors
diy vintage lace bag mod podge
How to make a fabulous vintage lace purse
First you have to decide which part of the bag should be covered in lace. Cut the lace a little bigger then that area, you will cut off the excess lace later on. Use the brush to put the Mod Podge on the bag. Put the lace on top of the Mod Podge and at another layer of Mod Podge to secure the lace. Let the Mod Podge dry. If you are not really patient, like me, you can use a blow dryer to speed up the drying process. Cut the lace in the right shape. To make the edges of the lace stay in place I used a little bit of fabric glue. This way you know for sure (well almost for sure) that this bag will stay just as beautiful as the day you made it.
credit by wilma

DIY – AN EASY WAY TO MOD PODGE YOUR SHOES WITH FABRIC

How to Mod Podge fabric on your shoes. An easy way to get the pattern for the fabric just right! @ By Wilma

 ☂ a pair of black pumps. it was time for a makeover. #: ) . used some vintage fabric and the heel is covered with fake leather. let’s get started! 

What you need to to Mod Podge your shoes with fabric
- old shoes
- paint brush
- fabric of your choice
- fake leather
- scissors
- contact paper
- pen
How to Mod Podge fabric on your shoes. An easy way to get the pattern for the fabric just right! @ By Wilma

How to Mod Podge your shoes with fabric

1. Look for some shoes that really need a make over. These are mine, you can see they really need a makeover!
2.  made the  pattern using contact paper! This is really easy because you can wrap it around the shoe and it will stick to it. took two pieces of contact paper and wrapped it around the shoe. After that cut off the excess.
3. Pull the contact paper from your shoes and stick it on your fabric. Cut around it, leave some extra fabric at the places where the hole of your shoe is (you can fold the fabric inward) and where the two pieces of fabric meet. Place for the second shoe the contact paper on the other side of your fabric and repeat.
4. Put a thick layer of Mod Podge on your shoe and glue the fabric on your shoe. You may need to make some small cuts to make it fit. Make some cuts at the excess fabric on top and glue it inside your shoe.
5. Put another layer of Mod Podge on top of your shoe to seal the fabric.
6. Repeat steps two, three and four for your fake leather heel.
7. Wait until the Mod Podge  is completely dry and your ‘new’ shoes are ready to wear!
credit by wilma

DIY – VINTAGE BUTTON BRACELET

DIY - Vintage button bracelet


Learn how to make a vintage button bracelet : ))
What you need for this vintage button bracelet
- three vintage buttons of your choice
- three strings of leather rope, long enough for a bracelet
- two fold over clamps
- 5 cm of chain
- clasp
- 2 jump rings
- scissors
DIY - Vintage button bracelet
 How to make a vintage button bracelet
1. Put the first clamp unto the beginning of the three leather ropes.
2. You want to add three vintage buttons. Decide how far apart you want them to go and how big your bracelet is going to be. When you know this you can decide where the first button has to go. Braid until the first button, put the button on one of the leather ropes and braid around it.
3. Repeat for the other two buttons and finish the braid. End with the other clamp. Put jump rings on both clamps. Add the clasp on one side and the chain on the other.
4. And your bracelet is ready to wear! XO Wilma
credit by bywilma

DIY Fringe Scarf


Everyone needs a go-to fringe scarf in their fashion repertoire. Here’s an easy way to make your own.

What You Will Need:
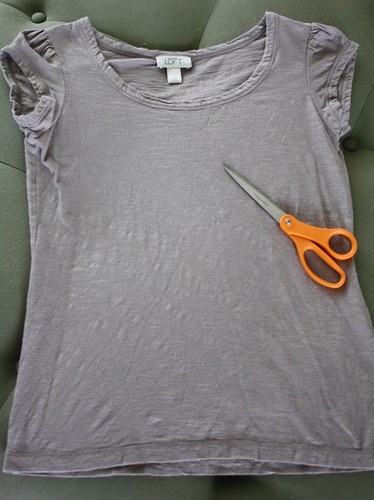
-Old T-Shirt
-Good Scissors

Step 1:
Go through your old T-shirts and find a daring print or color combo. For a cleaner look, choose a solid.

Step 2:
Cut horizontally across the shirt, just below the armholes, to create a rectangular tube.

Step 3:
Working your way around the tube, make a series of vertical cuts that extend from the raw edge upward. The longer the cut, the longer the fringe will be.

Step 4:
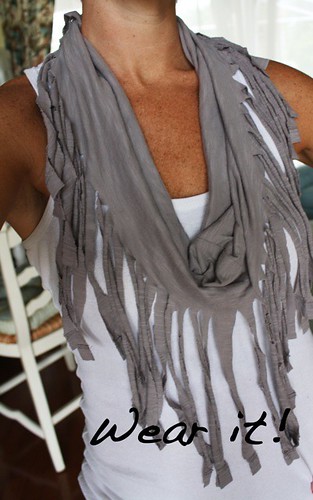
Tug down on each strand to elongate it. You can also have some additional fun with it by knotting some of the ends!

Find it 
Fringe1           

Cut it
 Fringe2

Slice it 
Fringe3


Pull it
Fringe4


Wear it
Fringe5

T shirt drawstring bag

tank top to beach tote


     Here is a tutorial for turning a tshirt or tank top into a drawstring beach bagBefore throwing        away your old, ill-fitting tank tops, put them to good use in a creative way. Reusing old tank tops to     create a new fashion accessory not only saves money on expensive hand-bags, but it also reduces waste, which is good for the environment. With few materials, you'll turn a fashionable tank top into a nifty    tote bag to carry around your little treasures.                                                                                   


1.   Grab a tshirt or tank top you want to reconstruct.
2.   Cut out the front and back of your bag.  I made mine a square at first, but then made it more of a trapezoid instead.  (I didn't have much trim room on the top of the shirt)
3.   My shirt didn't have enough space for the top edge, so I cut out two contrasting pieces.
4.   Make the top piece half an inch longer than the top edges lengthwise.
5.   Hem the two short edges of each green piece.  This way the top piece is the same length as the bag body.
6.   Fold the top small piece in half lengthwise, wrong sides together.  Sew this to the top edge of your main piece, right sides together. Do this for both the front and back pieces. This will be the casing for your straps.
7.   Top stitch for a clean finish.
8.   Cut out two pieces of cord, ribbon, or fabric that are each 54 inches long.  (27 inches when folded in half)
9.   Sew the bottom edges of the bag together.  Then feed each of your cords through each of the casings you created on the short edges.  (Take one end of a cord, attach a safety pin to one end and feed it through the (green) top casing. Repeat on other side with other cord.)) 
      Once the cords are fed through the casings, aim the majority towards to the interior of the bag.  (So the cords end up on the outside/right sides in the end.)
10.  Sew up the sides of the bag, right sides together.  Do not sew the top corners together, otherwise your drawstrings won't be able to scrunch.
11.  Place the raw ends of the cords at the bottom corners of the bag. I backstitched over them to be safe.
12.  Here is the bag inside out completely sewn.  Trim any access.

Saturday, August 4, 2012

Dip-Dye Hair

  HOW TO  
dip dye hair is the new hair-color styles,basically the same only Ombre hair is a name for a haircut with a combination of a dark hair colour with below that a lighter hair colour. The colors can be so aligned that the whole look is very chic.
let's gooooo .______________.
the summer 2012 trends
In order to start with our tutorial on how to dip dye hair, we would like to provide you with a list of essential things. A bleaching kit, aluminum foil or plastic bag, thin tipped comb, water and bucket for rinsing and a shampoo conditioner combo for rinsing damaged hair are the things required for a complete how to dip dye hair procedure. Once you have the required things with you, you simply have to get started with the procedure. You would have to start with preparation of the area, and follow it up with the application of the color, as mentioned in the bleaching kit. Now, you would have to cover the bleached area in the aluminum foil and allow it to work. Make sure that you do not over bleach as this can damage your hair. Once that is done, you can wash away your hair and treat them with the shampoo and conditioner combo for taking care of damaged hair.


Here some pictures of dip dye hair!


ผมสีชมพู


PLOY 
ผมสีชมพู
or !!
 Splat Bleach with Oxide
 Splat Colors
 Color Brush
 Clips & Foils
first step : Highlight the tips of the hair using Splat bleach with oxide.
  • Place the hair on a foil. Lightened the bottom 3 inches of hair, taking it as light as possible without causing any damage. It's best to “feather” on the bleach, painting a jagged line makes it blend better.
  • Let it process until it reaches a pale blonde. Use the appropriate heat if necessary.
  • Shampoo and lightly condition bleach out of the hair.
  • Blow hair completely dry. If it’s still wet, it will soak up less color.
  • Pour your splat color in a plastic bowl or plastic cup.
  • Place the hair on a foil (clip wrap works really well for the color part) and paint the tips of your hair
  • Process for 30 - 60 minutes 
FInish